Database
If you don't know what a database is, here is a very short and simplified explanation.
A database is just like any other file like Word or Excel files.
It can be moved from computer to computer and you can send them to other users of DfW.
The name of the default database is "dartsforwin.dfw", but you can of course set the file name
to anything you like. The default path to the database is C:\DartsforWindows\database, but you can
put your databases anywhere you like, also on a network drive. You can create as many databases you want, but
only one can be used at a time.
If you create a new database, you have to fill it again with players and team names
or import them from a previous database, just like if you create a new sheet in Excel or a new
document in Word.
Starting from scratch
When you start DfW for the first time, the database is empty, except for a few team names and the counties
playing in the
UKDA National League. There are no players in the database so you will have to
add them by hand or import from various sources, like CSV files, existing DfW databases
or from flat text files in the "speed registration" screen. If you use DfW for UKDA National League matches, you normally don't have to register
the players in the database. Darts for Windows offers a free service where you can download "ready to go" databases
containing all UKDA registered players for the currect season, selected division and match. This saves you a lot
of time and work registering players, spelling mistakes and so on and it also has the advantage of being 100% compatible
with the software the UKDA uses to run the UKDA National League. The files are available
from the "Tools > Create "ready to go databases" menu in DfW and can be downloaded straight into DfW
(the computer must be connected to the internet).
Adding players
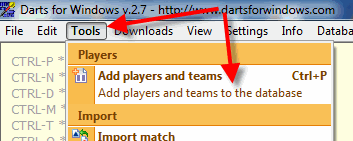
To start adding players, click the Tools menu and the menu item "Add players and teams" (see screenshot below), or
open the screen by using the keyboard shortcut CTRL-P.
This is how the "Add players and teams" screen look like when you open
DfW for the first time or after you have created a new database (from version 2.7.6.8 and above).
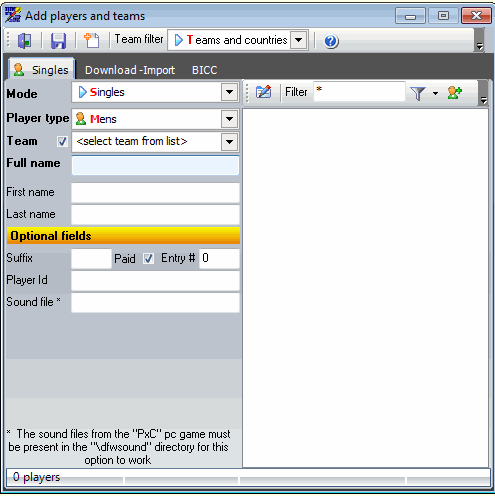
When you open the screen, the default mode is "Singles". This is where you normally add all players for
singles, pairs, triples and all kind of teams.
Please note that the default settings for listing teams are "Teams and countries", to view only UKDA National League counties,
change the "Team types" filter to "Counties" or "All" if you prefer to list all available teams in the database.
There is also another method to "speed register" players in a simpler way
if you don't need other information than the players name and the team name (can be set to "No Team" if team is not in use).
Click here to view the tutorial on how to "speed register" players.
"Speed registration" has also been added to the "Add players and teams" screen from version 2.7.6.8.
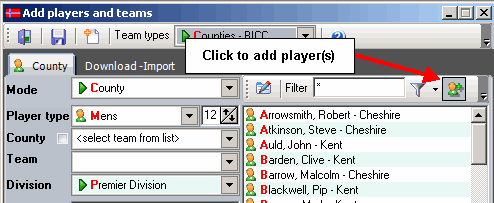
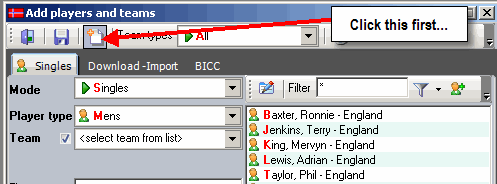
If you are setting up a team for a UKDA National League match for example using a "ready to go" database and
one or more players are missing from the database, you can
add missing players by clicking on the "Add players" button.
This option is also available when in pairs, triples, Super League mode and so on (see screenshot below).
Team types
The default setting for team types are "Teams and countries". If you want to add UKDA National League players,
you must switch the team type to "Counties" or "All". The reason for organizing DfW this way is that
the list of counties are very long (70). The "Teams and countries" are used for normal teams and nations + Super League.
From version 2.7.4.1 you can create teams tagged as Super League, but they are still shown when selecting
"Teams and countries".

Team names
When opening DfW for the first time or the first time after you have created a new database, the team names in the database
is only Canada, England, Netherlands, No Team, Norway, Northern Ireland, Republic of Ireland, Scotland and Wales ++.
You can of course add or remove any team name you like. The only thing you should be aware of is that if you want to delete
a team name from the database the team name must not be in use (linked to a player, team or match).
Everything associated to the team name must be deleted before you can delete the team name itself.
The "No Team" team is used when a player does not belong to a specific team or you choose to not use team names.
When a player is assigned to the No Team team, the team name is now shown in f.ex. a draw created in DfW.
"No Team" makes the team name invisible, that is the whole idea behind the name.
Adding team names to the team list
Before we start adding players to the database, you will probably add some more team names to the database.
From version 2.7.4.1, multiple teams can be added without having to close the team name editor every time
you create a new team name.
To start adding team names to the "Teams" list, click the menu button as shown in the picture to the right.
 When you click the button (1), a menu with a lot of options will be visible.
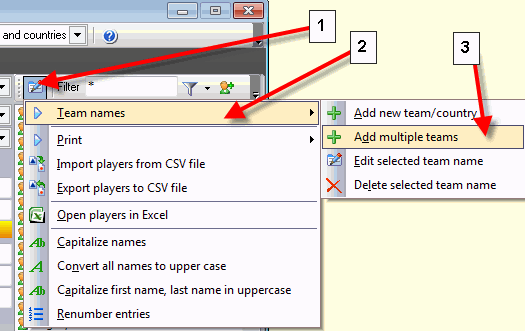
Click the item "Team names" (2) and then "Add multiple teams" (3) or "Add new team/country" to
add a single team name. You can of course use the "Add multiple teams" if you only want to add one single
team to the list. In this tutorial I use the "Add multiple teams" option.
In this sample I will create a couple of Super League teams, add two countries and one normal team.
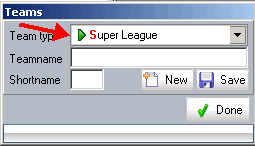
We start with the Super League teams. Set the "Team type" to Super League" as shown in the picture above.
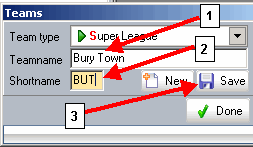
Fill in the name of the team (1), the short name (2) and then click the "Save" (3) button
to save the team.
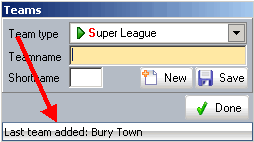
You don't have to click the "New" button at all, only if you want to clear the fields.
Every time a new team is added, all fields are cleared. Repeat the steps for adding more teams.
Set the team type to "Teams and countries" when adding a country or a normal team not used
for Super League. It is up to the user how you organize yourself. These instructions are only for guiding you
and to give you a understanding on how Darts for Windows work.
When you are done adding the teams, click the "Done" button to close the form.
Adding players by "speed registration" (version 2.7.6.8 and above)
The advantage of using the speed registration is that it is a lot faster and you can also
copy and paste the names from different sources like e-mail, text files and so on.
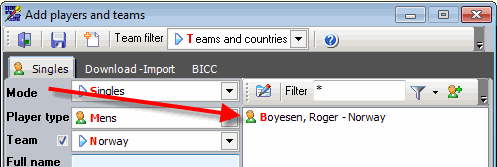
When you use the speed registration option you never have to click the new button in the toolbar or anything, just
put inn the name in the "Full name" field and press the ENTER (return) key
on the keyboard to save the player to the database.
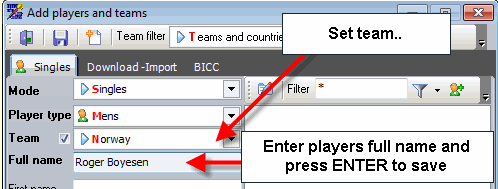
You must of course set a team name first or else you will get an error message.
The disadvantage of using the speed registration is that you can not fill in any of the optional
fields like entry number, paid status (used for tournaments) and so on, they will simply be ignored by the saving procedure, but these fields
can be edited later when you are done adding the players. Most users will probably never use the optional fields anyway.
Adding players the traditional way with extended properties
To start adding players to the database, click the "New" button as shown in the picture below.
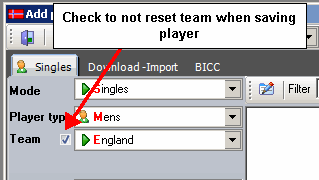
If you are adding more than one player from the same team to the database, check the box to the
left of the "Teams" dropdown box, or else the team must be selected for every single player.
If you check or uncheck the box, the setting is saved to the registry and restored the next time
you open the screen.
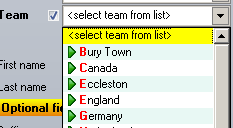
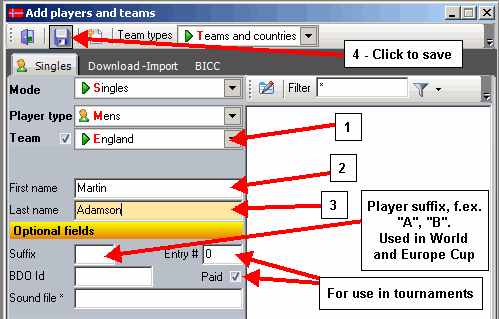
Select the team (1), enter the first name (2), the last name (3) and then click the "Save" (4) button.
To progress to next field, just press the ENTER key on the keyboard. Repeat the step until done.
There are optional fields like "Paid" who is used for tournaments. Check or uncheck if the player
has paid the entry fee or not. The entry number is set automatically by DfW. A list of players with the "Paid" status
and entry number can be printed from the menu button.
The Player id field is used for UKDA National League matches. This field is used by the UKDA to identify the player
playing a National League match. The value in this field is set automatically when using a "ready to go" database
in a National League match. All enquiries regarding players in the "ready to go" databases
must be done by contacting the UKDA.
The author of DfW is not responsible for registering players in the UKDA database
or correcting spelling errors.
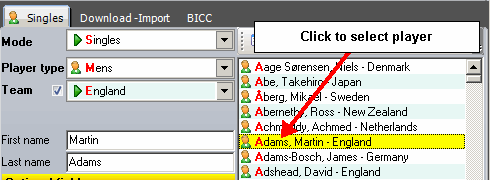
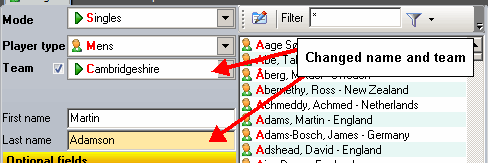
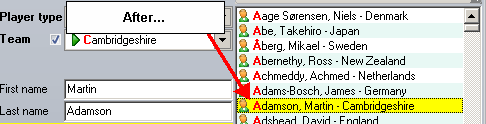
Edit a player
It is of course possible to edit a player after the player has been saved if you have done a spelling error or you
may want to change the team the player is assigned to. When you change the team of a player,
score sheets from matches for the player (if any) played before the team was changed
are not changed in the database.
The only time the score sheets and other things are updated/changed is when you change the name of a team
for some reason.
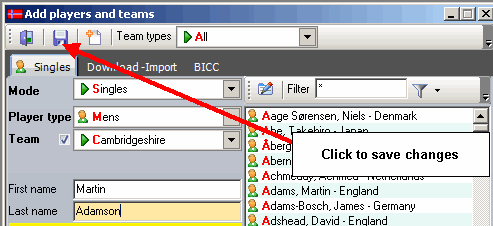
To edit a player, click the name to select, do the changes and then click the "Save" icon (the diskette) in the tool bar.